Mini Squares, for the Mini Soren.
May 29, 2010
My husband isn't happy about this....
He helps out at SLD by helping cut lots of squares. Lots and lots of them. And when he heard "Doll Dress," he panicked. Rightly so! :) Because now he not only helps cut regular SLD squares, and infant size , we now cuts teeny tiny squares too.....
May 28, 2010
Serger tutorial...ripping out a seam
Ugh. We've all done it...had to pretend we're in love with our seam ripper and lured them with cookies and ice cream so that they'll be our best friend and comply to all our requests.... Or maybe that's just how my relationship with my dear seam ripper goes. ;)
There is nothing worse than having to remove a serged seam. Now, you may ALL know how to rip out a serged seam, or maybe you never make mistakes ;) But maybe, just maybe, a few of you are just like me; you dive into something without thinking twice and later regret it because of all the seams you then have to remove, and you don't know the most efficient way to do it!
Here's how I do it. It's not pretty, I'm warning you now :) This may also be one of the more lame tutorials around, but if it helps even one person, then I may catch a break in the seam ripping karma department ;)
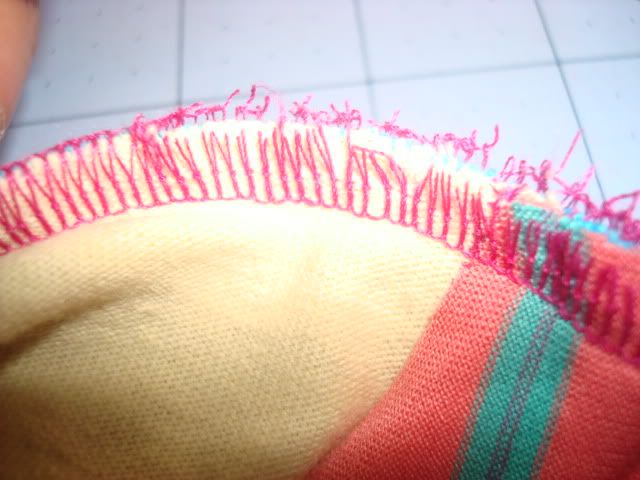
The culprit today, a neckline that was too big.
So, take your trusty seam ripper, and put it through the top half of the stitch
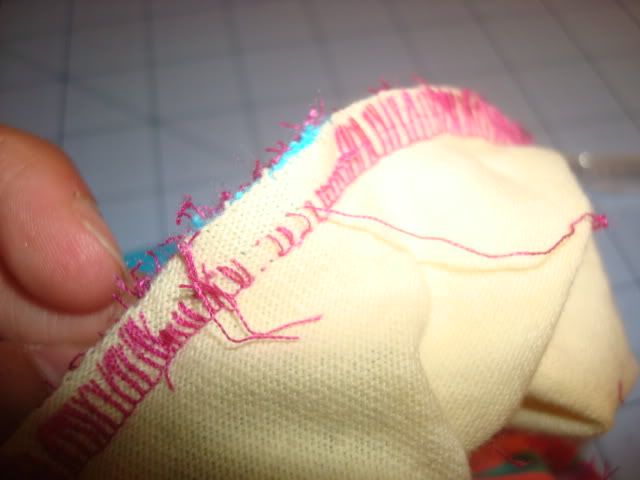
Keep going all the way around until you are done. Then open the seam just a bit and rip out a few small stitches:
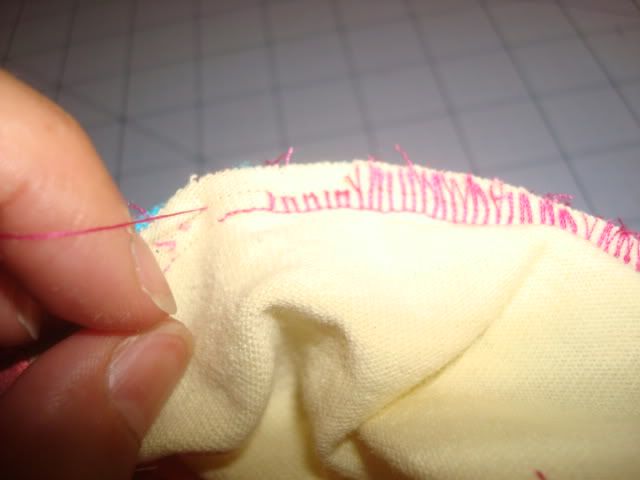
Once you start to pull it apart a little, you will wind up with one longer thread...that's the one you get to pull:
See how it removed the whole line of thread that was sewn by one of your needles?
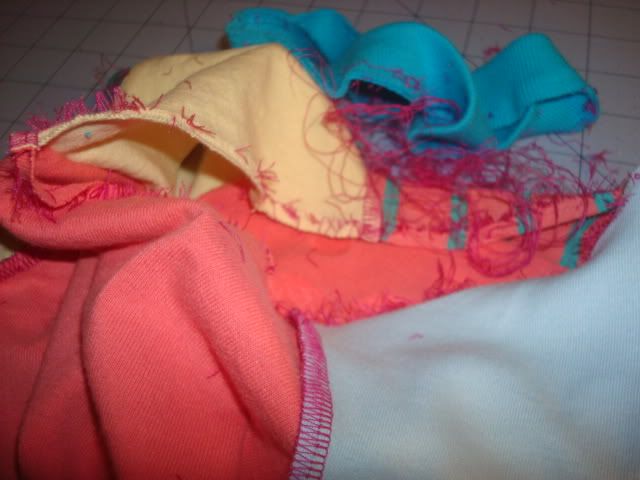
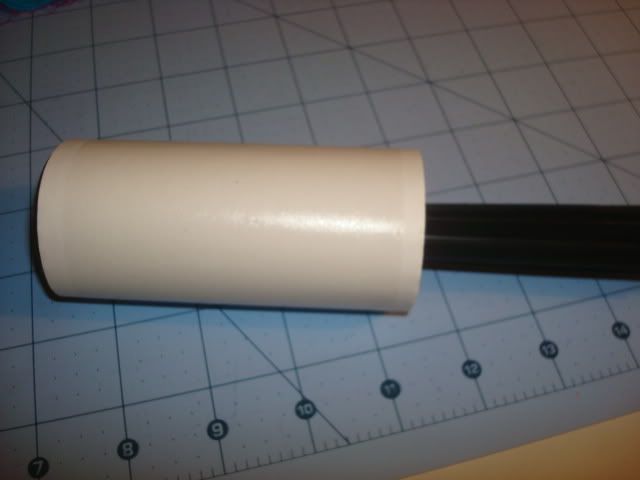
Keep doing this until you've gotten all your threads out. And then....ugh, you're left with this:
But do not fret! This thing is my savior (have you seen me use it as a vacuum before?)
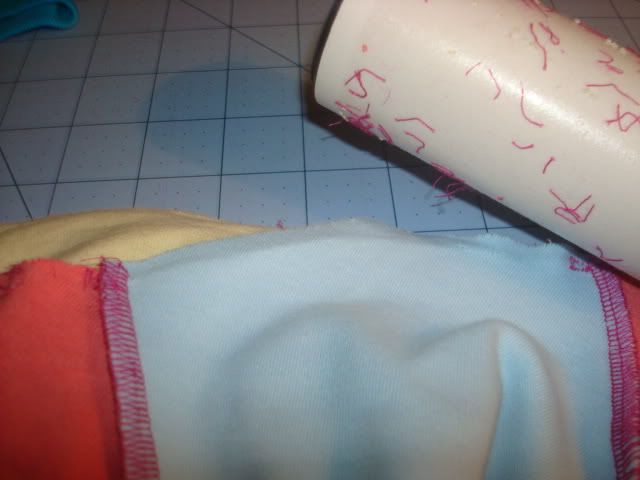
With one swift roll...
Tada!
And that's how I rip out my serged seams. Uh, anyone know an easier way? ;)
xo,
Shari
What is Fugly Upcycling you ask?
It's really, really ugly (anything with an F in front of it is baaaaad ;) turned hopefully great. :) That was the goal of the upcyclers challenge a few friends and I put on. We picked names from a hat, sent our ugliest knits to the person who drew our name, and wait for the mail lady to come with something upcycled brilliantly for our kiddos!
So it seems I understood the challenge quite well. Oh did I pick ugly. Look what Olivia (of recent etsy shop fame Olivia's Ultimate, plus a photographer extraordinaire) received in my Fugly Mailing:
Yup, that's REALLY fugly. So much so that I really don't want Finley wearing anything made from it, HA!
Now Lisa, of Ellebows, is the one who was supposed to supply me with fugly knits. I had to send her back to the drawing board 3 times because everything she gave me was too cute!! We finally settled on this:
Now, it wasn't so much fugly, but a challenge. The brown stripes is a very stretchy ribbed hoodie, and the other piece is a heavily embroidered knit skirt.
I knew I couldn't turn it into a typical SLD because of all the embroidery, so I decided to go totally out of character and make her a shabby chic two piece halter and matching capris :)
I took a panel of the skirt with some plain pink tee and turned that into a halter top, incorporating the brown stripes of course into the straps.
Then I turned the hoodie into super casual capris and turned an embroidered patch into oversize pockets.
I managed to use the fugly knits as 90% of my upcycling, which was really cool!!
Now, if you're inspired to upcycle some fugly....then get in on the action at Lil Blue Boo, where she is hosting The Great Ugly Knit Upcycle Contest! Your ugliest things hiding in the back of your closet may magically transform into something cool. Plus you may win a sewing machine for doing it. :)
Now that is upcycling at its best :)
xo,
shari
May 25, 2010
Planning Finley's birthday party....
I'm a little bit rusty. Finley's party was canceled last year. First she had bronchitis, and then when we tried to reschedule it she flipped out and didn't want a party. So we haven't had a birthday party since she turned 2! Wow, that's pretty crazy, considering she is turning 4 now!
Her 2nd birthday party was a smash Art themed party. I wanted to share a few pictures... I loved it!
For the invitations, I had cards printed at shutterfly.com using images of Finley painting. We had so much fun painting in the grass that day! Here is the front of the invitation:
I made them so that they seemed like an art gallery invitation. So here is the inside :)
I hung art all around the house that Finley created, and then emptied out my dining room and created this giant coloring wall. A friend converted a photo of each kid into a line drawing and each child had a bunch of stickers and crayons to draw with (and of course take home!)
Here it is in action:
An artist themed cake....on top of the tablecloth that Finley and I drew all over :) Oh, plus the painted rocks she worked on as table decor. :)
And while I don't have pictures, I made the food color-centric and each plate or bowl was one color....so pink was watermelon, green was veggies etc.....
For favors, Finley painted a frame for each child to take home, that had their very own photo inside. I also had a wooden letter of each child's first initial, tied up with some crayons for them to decorate.
Here's Finley the night before the party with all her hard work :)
Here is the happy birthday girl...
And her proud Mummy.....
It was a really fun theme and there are SO many directions you can take it. This years theme is BOOKS! Finley adores books and reading. Got any party ideas for me??
xo,
shari
Labels:
about me,
birthdays,
family,
kids activities
May 24, 2010
Balancing Act....
I recently read this great blog post over at Oh My! Handmade Goodness (so sad they are closing down!) It's all about people like me (and many of you) who are balancing 'day' jobs and their passion, in my case, Soren Lorensen Design. But some of us have an additional 'job,' our kids. Wow, it's a lot to handle!
I really liked reading this post because it reminded me of a few things...primarily the prioritize part. In this case, I need to start making "eating together as a family" a priority. What usually ends up happening is Finley eats dinner at 6:30 while she hangs with Daddy, and I sew. That's something we have to change. Starting tonight (hold me to it, will ya? ;)
I also realized that I have not been dealing with SLD in the same way I've dealt with any of my past businesses. My very first 'business' was making crochet bags/purses when I was in school. That's waaaaay before etsy was around ;) I named the company 'Baguette' and mostly sold to friends, and friends of friends. I loved it, but didn't ever make a single dime considering the time it took and the price I sold for (I think each bag took me like 3 hours and I sold them for $15 each. Ha! I was only 19 though :) I WISH I could find a picture of one :)
Once had a fine art consulting company, called Per Se. I actually had some small success with this business, but nothing huge. Then of course, there is Happy Chickadee, a great online shop for girls that is still doing great, and now SLD. My point? I'm getting there :)
I think what has happened with SLD for me is pure love. I love doing this. I didn't need fancy business cards or hang tags (and judging from the photo above, I also don't need fancy clothes ;). I didn't need to research, see my 'competition' etc. I just know I love it. And then finding other people who love it. And go from there. I know it sounds so simple, it actually isn't, but it's a start in the journey. I have no clue what will happen to SLD over time, but right now I'm not really going to question it. :)
I know, this is LOUSY business advice, definitely opposite of what most people advise, so please, don't listen to me, and go read all those articles out there in cyberspace! But I think there is something different when it comes to handmade... all you can do is start.
Start making what you love. Create. Put it out there for the world to see. The worst thing that can happen is people will see what you are making. And that, is the start of it all :)
Anyhow, this long winded-me came about from the blog post at OMHG so please go check it out :)
xo
Shari
I really liked reading this post because it reminded me of a few things...primarily the prioritize part. In this case, I need to start making "eating together as a family" a priority. What usually ends up happening is Finley eats dinner at 6:30 while she hangs with Daddy, and I sew. That's something we have to change. Starting tonight (hold me to it, will ya? ;)
I also realized that I have not been dealing with SLD in the same way I've dealt with any of my past businesses. My very first 'business' was making crochet bags/purses when I was in school. That's waaaaay before etsy was around ;) I named the company 'Baguette' and mostly sold to friends, and friends of friends. I loved it, but didn't ever make a single dime considering the time it took and the price I sold for (I think each bag took me like 3 hours and I sold them for $15 each. Ha! I was only 19 though :) I WISH I could find a picture of one :)
Once had a fine art consulting company, called Per Se. I actually had some small success with this business, but nothing huge. Then of course, there is Happy Chickadee, a great online shop for girls that is still doing great, and now SLD. My point? I'm getting there :)
My point is that all these other businesses (except Baguette ;) I took SO seriously. I spent months analyzing, creating my business plans, checking out competition, advertising, buying fancy business cards, spending money etc. Now, I'm not saying you should not do all that, but..... well, I guess I kind of am saying that, to start (note: if it's a 'handmade' type of business. ;)
I think what has happened with SLD for me is pure love. I love doing this. I didn't need fancy business cards or hang tags (and judging from the photo above, I also don't need fancy clothes ;). I didn't need to research, see my 'competition' etc. I just know I love it. And then finding other people who love it. And go from there. I know it sounds so simple, it actually isn't, but it's a start in the journey. I have no clue what will happen to SLD over time, but right now I'm not really going to question it. :)
I know, this is LOUSY business advice, definitely opposite of what most people advise, so please, don't listen to me, and go read all those articles out there in cyberspace! But I think there is something different when it comes to handmade... all you can do is start.
Start making what you love. Create. Put it out there for the world to see. The worst thing that can happen is people will see what you are making. And that, is the start of it all :)
Anyhow, this long winded-me came about from the blog post at OMHG so please go check it out :)
xo
Shari
Labels:
about me,
business,
inspiration
May 18, 2010
Your gifts have arrived!
I'm so excited about this! I always try to include a little tiny gifty in every order from SLD. But when I ran out of my recent gifts, I started looking around and found a guy in Peru who sells handmade finger puppets!
Finley and I had so much fun picking which styles to order...I had an impossible time narrowing it down so we ordered a lot ;)
Here are just a few of my favorites :)
So watch for one of these in your next order!
xo,
Shari (and a massive amount of new finger puppet friends)
Finley and I had so much fun picking which styles to order...I had an impossible time narrowing it down so we ordered a lot ;)
Here are just a few of my favorites :)
So watch for one of these in your next order!
xo,
Shari (and a massive amount of new finger puppet friends)
Labels:
kid gift ideas
May 12, 2010
Have I ever mentioned that I just can't say "No"......
I have a really hard time saying No. I want to help and be everything to everybody. It's a character flaw, I know. :) So when I got an email from a super sweet woman who is opening up a small 'boutique within a boutique' in Wisconsin and wanted some of my SLDs for her shop...well, how could I say No? :)
She will be featuring a bunch of handmade and upcycled kids clothing items. I am really excited for her! It's been a dream of hers and I can't wait to hear what kind of response she gets to upcycled items in the non etsy world! Wow, real life world of shopping, does that actually exist offline? ;)
So she ordered 30 items. Yup, you read that right. But she's so nice, she let me get away with just 17. :) And today, I am tagging, packing and shipping off 17 dresses, skirts and tees! It's actually really cool to see a BUNCH of SLDs all hanging together. I never have this many made all at once!
So goodbye SLDs...have fun in Wisconsin!
xo
shari
She will be featuring a bunch of handmade and upcycled kids clothing items. I am really excited for her! It's been a dream of hers and I can't wait to hear what kind of response she gets to upcycled items in the non etsy world! Wow, real life world of shopping, does that actually exist offline? ;)
So she ordered 30 items. Yup, you read that right. But she's so nice, she let me get away with just 17. :) And today, I am tagging, packing and shipping off 17 dresses, skirts and tees! It's actually really cool to see a BUNCH of SLDs all hanging together. I never have this many made all at once!
Here are a few of my favorite dresses in the bunch....
(you know me, I am a total sucker for anything with a cassette tape on it!! ;)
(My husband thought this might be a good tee for me ;)
Plus, I didn't forget the boys.....
So goodbye SLDs...have fun in Wisconsin!
xo
shari
May 10, 2010
I've really got nothing to say....
Yet I find myself writing here anyways. Once again, this isn't about sewing or craftiness...but about me. I always told myself that if I had my own blog that I would be honest and be myself. Afterall, I think blogging is a lot like the Oprah show .....it lets people know that 'you are not alone.'
She is funny, bright, charming, a little devilish, and she also has a sensory processing disorder. It makes most days a challenge. We have meltdowns (not tantrums) over nothing, out of nowhere. We have moments where she doesn't want to be talked to or touched, and we have days of not leaving the house.
We used to go to Occupational Therapy every week, and also a pediatric psychologist once a week, but we're taking a break from that right now. We're trying to just deal with whatever comes our way, and try to figure out solutions to our 'issues.'
But guess what? It's taken me nearly three years of realizing this to get to this point. A point where I can say "So what?!" Is it terrible that a child doesn't want to always play with the other kids? So, she'll turn out to be an adult that may not be the life of a party, or dancing on tables, and that, my friends, is probably a good thing. ;)
So what if it takes her abut an hour to warm up to new scenarios....that just means I can save my money now on all those Mommy and Me classes and gymnastics and ballet etc since she would sit on my lap the first hour (being the entire class) and in the end I save a bunch of money. :)
So what if it takes about 20 minutes to dress her in the mornings? I just have to wake up to the sunshine that much earlier (ok, this one may be more of an annoyance than I am admitting to, haha!).... But the point is "SO WHAT!"
I mean, she's healthy. We have a roof over our heads. She has an amazing wardrobe (materialistic, I know, but she has clothes, many kids don't!) and we have the most incredible loving family. It's taken me quite a while, but I know I am not alone in dealing with a 'difficult' child, and I know that while this used to concern me and occupy my brain most of my waking moments, now I can sit back and tell myself 'It's going to be OK." We're lucky, because I know that's true. It took stopping all those appointments with specialists to gain a little perspective.
So Happy Mother's day again, to all those amazing mothers who deal with whatever challenges your kids throw your way. One day we may be walking them down the aisle wondering what all the fuss was about. :)
xo
Shari
May 06, 2010
Happy Mother's Day!
Before I was a mom I never tripped over toys or forgot words to a lullaby. I didn't worry whether or not my plants were poisonous. I never thought about immunizations. Before I was a mom - I had never been puked on...pooped on...chewed on...peed on . I had complete control of my mind and my thoughts. I slept ALL night . Before I was a mom, I never held down a screaming child so doctors could do tests; or give shots. I never looked into teary eyes and cried. I never got gloriously happy over a simple grin. I never sat up late hours at night watching a baby sleep.
Before I was a mom i never held a sleeping baby just because i didn't want to put them down. I never felt my heart break into a million pieces when i couldn't stop the hurt . I never knew something so small could affect my life so much. I never knew that I could love someone so much. I never knew I would love being a mom.
Before I was a mom - I didn't know the feeling of having my heart outside my body. I didn't know how special it could feel to feed a hungry baby. I didn't know that bond between a mother and her child. I didn't know that something so small could make me feel so important and happy. Before I was a mom- I had never gotten up in the middle of the night every 10 minutes to make sure they were okay. I had never felt the warmth , the joy, the love , the heartache, the wonderment or the satisfaction of being a mom.
I didn't know i was capable of feeling so much - before I was a mom...
I'll add a few things that I never knew about 'before I was a mom' to my darling Finley, who crazily enough will soon be four. This is my note to her.....
I never knew that seeing you wrinkle up your nose and smile would make me giggle so much. I never knew that hearing you say your first real word "baby" would make me long for you to stay a baby forever. I never knew that hearing you sigh as you fall asleep would be the most wonderful sound on the planet. I never knew that hearing you say "Mummy" in your sweet voice could make everything else go away. I never knew that feeling you rub my arm with your thumb, as you do when you are nervous, would make me feel so protective of you. I never knew that I could listen to the same lullaby CD over a thousand times and not go mad. I never knew how obsessed I would become over what was on your dinner plate. I never knew how much I would enjoy shopping for your clothes. I never knew that I would become master entertainer, puppeteer, dancer, storyteller and more. I never knew that I could feel so completely inept and within seconds also feel like I could do no wrong, and had superhuman strength, because of you. I never knew what a true good soul was until seeing you cheer on everyone else at the playground, while you chose to sit at the sidelines. I never knew what quiet time really meant. And mostly, I never knew how much you would change my life and the path that I take. I am a better person because of you, dear Finley.
Happy mother's day to some of my favorite mothers!!
xo
shari
Labels:
about me,
family,
inspiration
May 04, 2010
Tutorial for faking a coverstitch....
I've been away awhile! Poor blog. :( Why is it so hard to post something daily when I manage to waste at least an hour on Facebook every day? ;)
Anyhow, here is my newest tutorial. I bet there are a million and one ways to do this. Mine may not necessarily be the best method, but it's how I've faked the look I LOVE since getting my serger. The look I am talking about is this:
This is my favorite Baby Sara tee ever. I love how they use the stitching in contrasting colors!
So this is how I've faked it.... You'll need the following things:
A serger
A regular sewing machine
That's it!
Let's work on a cuff. But you can use this look anywhere, including necks, where they look really cool!
Start with your cuff fabric you've cut:
Run each long side through your serger:
And you end up with this:
Iron in half. Actually, wait, iron in slightly less than half. This way you will ensure that you catch the other side when sewing together. I won't show you my ironing board, it's a mess! But here's what you end up with:
Note that one side of your serger exposes the needle thread. I like to keep that side as the top side because I find it's cleanest, and is a good line to follow when sewing it on.
Next, grab your sleeve and put the cuff on it's end, and pin.
Make sure the back is the taller end!
Now, get out that dusty sewing machine (if you have a serger, it's probably dusty ;)
You'll want to pull a little at your cuff as you sew it on. I use that thread line as a guide. You can sew above it, on it, whatever you prefer.
Because you are stretching your cuff, you'll find that as you reach each pin your fabric will not be flat. So remove pins as you approach them and then continue to sew. (Eeegad!! excuse my cuticles!!!)
(Don't do what I did below, and let your bobbin thread run out half way!)
Once you reach the end, you've got your faux coverstitch!
Sew onto your tee shirt:
and you are DONE!
Oh, and just make note that because you've sewn on top of your rib fabric, you've technically removed it's stretch from it. So keep that in mind when you make your shirt that the cuff will NOT stretch.
Hope this works for you! Share any pictures with me of your creations!
And now I'm heading back to Facebook.....
Subscribe to:
Posts (Atom)